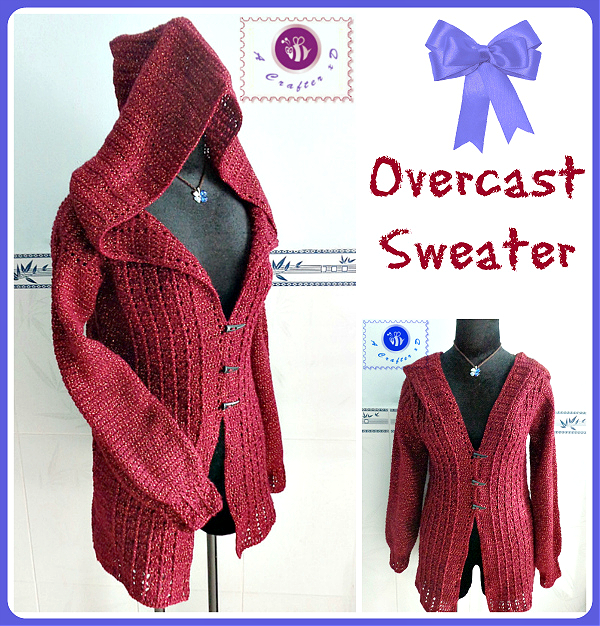
This one is the sleeved version of the Overcast vest. I made it purposely for this holiday and you can see it by the festive-shimmery yarn type.
Click here to <3 this pattern on Ravelry
Materials: ( I used )
4mm crochet hook
Lightweight/ DK yarn: shimmery burgundy color ( about 500 gr for the sample – size M/ 100 gr or 328 yds per skein )
( Check out my Yarn shop – free worldwide shipping )
Buttons
Yarn needle
Scissors
Note: I used chainless starting dc for every first dc of each row/ round instead of ch 3. There’s another good crochet technique to use is ch 2, dc into the same stitch ( counted as 1st dc). In the pattern below you’ll see I simply state dc into 1st stitch for every first dc of each row/round, so just choose your best technique 🙂
Special stitch used:
3dc-shell stitch ( 3 double crochet stitches into same stitch or space )
3dc – cluster stitch:
Yarn over, and insert your hook into the next stitch. Yarn over, and pull up a loop ( now you have 3 loops on the hook ). Yarn over, and pull through 2 loops ( now you have 2 loops on the hook ).
Yarn over, and insert your hook into the next stitch. Yarn over, and pull up a loop ( now you have 4 loops on the hook ). Yarn over, and pull through 2 loops ( now you have 3 loops on the hook ).
Yarn over, and insert your hook into the next stitch. Yarn over, and pull up a loop ( now you have 5 loops on the hook ). Yarn over, and pull through 2 loops ( now you have 4 loops on the hook ).
Yarn over, and pull through 4 loops on the hook.
This crochet Overcast sweater pattern fits size L ( chest size: 36 to 38 inches )
Skill level: Intermediate
Gauge: 9 double crochet stitches x 5 rows = approximately 2 inches ( with materials indicated )

Sweater:
Back part: work in rows
R1: Ch87, dc into 3rd chain from hook ( first 2 chain doesn’t count as 1st dc ), 84 dc across, total 85 sts, turn.
R2: 12 dc across, ( fpdc around next st, skip 1 st, 3dc- shell stitch into next st, skip 1 st ) x 15 times across, fpdc around next st, 12 dc across, turn.
R3: 12 dc across, ( bpdc around next st, ch1, 3dc-cluster stitch across next 3dc-shell stitch, ch1 ) x 15 times across, bpdc around next st, 12 dc across, turn.
R4: 12 dc across, ( fpdc around next st, skip ch1-space, 3dc- shell stitch into next st, skip ch1-space ) x 15 times across, fpdc around next st, 12 dc across, turn.
Repeat (R3 and R4) alternately until you reach R62 ( fasten off )
Front part: work in rows
#1
R1: Ch45, dc into 3rd chain from hook ( first 2 chain doesn’t count as 1st dc ), 42 dc across, total 43 sts, turn.
R2: 12 dc across, ( fpdc around next st, skip 1 st, 3dc- shell stitch into next st, skip 1 st ) x 6 times across, fpdc around next st, 6 dc across, turn.
R3: 6 dc across, ( bpdc around next st, ch1, 3dc-cluster stitch across next 3dc-shell stitch, ch1 ) x 6 times across, bpdc around next st, 12 dc across, turn.
R4: 12 dc across, ( fpdc around next st, skip ch1-space, 3dc- shell stitch into next st, skip ch1-space ) x 6 times across, fpdc around next st, 6 dc across, turn.
Repeat (R3 and R4) alternately until you reach R62. ( fasten off )
#2
R1: Ch45, dc into 3rd chain from hook ( first 2 chain doesn’t count as 1st dc ), 42 dc across, total 43 sts, turn.
R2: 6 dc across, ( fpdc around next st, skip 1 st, 3dc- shell stitch into next st, skip 1 st ) x 6 times across, fpdc around next st, 12 dc across, turn.
R3: 12 dc across, ( bpdc around next st, ch1, 3dc-cluster stitch across next 3dc-shell stitch, ch1 ) x 6 times across, bpdc around next st, 6 dc across, turn.
R4: 6 dc across, ( fpdc around next st, skip ch1-space, 3dc- shell stitch into next st, skip ch1-space ) x 6 times across, fpdc around next st, 12 dc across, turn.
Repeat (R3 and R4) alternately until you reach R62. ( fasten off )
- From the wrong side:
Seam shoulder lines with sc ( 18 sts )
Seam body lines ( from R1 to R46 ) with sc (2 sc into every dc-space)
Sleeves: ( make 2 ), work in rounds
After seaming body lines with sc ( 46 rows from the bottom up )
Join yarn and insert hook into the place where you made the last sc of seaming body line.
R1: sc around ( 2 sc into each dc space ), total 64 sts, sl into 1st stitch to join.
R2: 64 dc around, sl into 1st stitch to join.
R3 to R40: same as R2
R41: ( 2 dc across, dec dc ) x 16 times around, total 48 sts, sl into 1st stitch to join.
R42: ( dc, dec dc ) x 16 times around, total 32 sts, sl into 1st stitch to join.
R43: 32 dc around, sl into 1st stitch to join.
R44: ( fpdc, skip 1 st, 3dc- shell stitch into next st, skip 1 st ) x 8 times around, sl into 1st stitch to join.
R45: ( fpdc, ch1, 3dc-cluster stitch across next 3dc-shell stitch, ch1 ) x 8 times around, sl into 1st stitch to join.
R46: ( fpdc, skip ch1-space, 3dc- shell stitch into next st, skip ch1-space ) x 8 times around, sl into 1st stitch to join.
Repeat R45 and R46 one more time until you reach R48.
R49: 32 hdc around ( fasten off, weave in ends )
Repeat on the other side to get the other sleeve.
Hood:
R1: Join yarn and insert hook into 1 side of the neckline, dc across, turn.
R2: dc across, turn.
R3 to R30: same as R2
From the wrong side, fold in half and seam the top with sc. ( fasten off, weave in ends )
- Sc across the hood line and button line, choose your best positions for the buttons and make a chain as button loops (it depends on the size of buttons you chose, bigger buttons bigger loops). When you reach the end of the other side, turn. Ch1 and sc across again, this time sc into the chains you made (button loops), sc across (fasten off)

- Sc hemline as borders (fasten off, weave in ends)
- Sew buttons on.

You can have size S to 3XL ad-free patterns with stitches diagram in this instant download pdf file on:
( There’s an itsy bitsy fee for it, thanks for your support )
Happy crocheting xD
Written pattern and photos copyright Maz Kwok 2015. Please do not repost, republish or sell the content or photos as your own. You can sell the items you made from this pattern as long as you use your pictures and give back proper credit. Please do share this pattern with others by link. For more info, visit my Copyright page.
- Stay in touch via my social media channels: Facebook, Pinterest, Twitter, Instagram or subscribe to my Newsletter.
- Use the green button at the bottom of this post to print or save a PDF file for personal use.

Would like to make the hoodie for my self what bust size would a L or XL be it ok in inches I am old school Thank you,
Hi there,
The pattern is for size L ( please see the Note section ). Size XL bust size is: 40 to 42 inches.
Can you tell me the type o f buttons that you used and where you purchased them?
Thanks!
They are horn-like toggle buttons. Just search for horn toggle buttons on Amazon or Ebay… You’ll see load of them 🙂
I need clarification on the working up of the back and sides. The instructions say to repeat rows 3 & 4 until you reach row 60. Does that mean complete row 60 or stop after completing row 59? Thank you for your help. I am making this for my daughter she fell in love with the sweater as soon as she saw it.
Hi there,
It means you will have to finish/ complete row 60 🙂
How many skeins would the L or XL take
You will need 6 skeins 🙂
I just love all of your patterns!!! Thank you so much for sharing. I wish you and yours a very happy and healthy New Year!!! May your good times of 2015 be your down times in 2016!!
Thank you Cindy. Wish a great new year ahead !