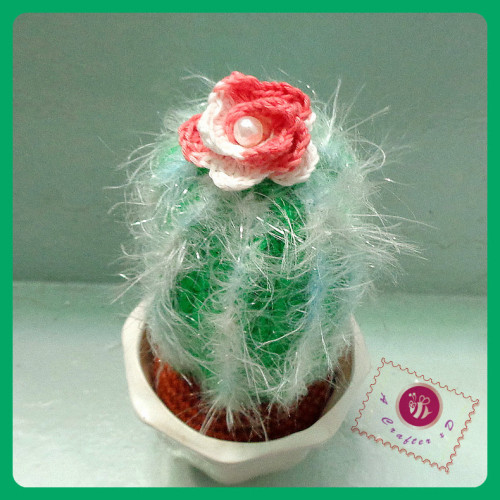
Do you like old man cactus or old lady cactus? These are very unique plants covered in white spines. Still, I chose to name this crochet cactus amigurumi pattern “Icy cactus”, just love the glitter from white eyelash yarn on it.
Click here to <3 this pattern on Ravelry
Materials: (I used)
A small pot
Crochet hooks: 5mm and 3,5mm
Worsted weight yarn: brown, green
Scissors
Eyelash yarn: white
Fiber fill
Yarn needle
Pattern:
Soil: using brown yarn, 5mm crochet hook
Note: it depends on the pot you have, increase or decrease the biggest rounds to create a ball of soild that fits in your pot.
R1: form a magic ring, 7 sc, 7 sts
R2: inc x 7 times, 14 sts
R3: (sc, inc) x 7 times, 21 sts
R4: (inc, 2 sc) x 7 times, 28 sts
R5: (3 sc, inc) x 7 times, 35 sts
R6: (inc, 4 sc) x 7 times, 42 sts
R7: (5 sc, inc) x 7 times, 49 sts
R8 to R15: sc around, 49 sts
R16: (5 sc, dec) x 7 times, 42 sts
R17: (dec, 4 sc) x 7 times, 35 sts
R18: (3 sc, dec) x 7 times, 28 sts
R19: (dec, 2 sc) x 7 times, 21 sts (begin stuffing)
R20: (sc, dec) x 7 times, 14 sts
R21: dec x 7 times, 7 sts ( fasten off and weave in end)
Castus: using green yarn and 3,5 mm crochet hook
Note: I used a smaller hook to prevent the exposed fiber fill because this part is crocheted by double crochet and front post double stitches.
R1: ch 25, dc into 3rd chain from hook, 22 sts
R2: turn, ch 3 (as 1 dc or standing dc technique), fpdc across, 22 sts
R3: turn, ch 3 (as 1 dc or standing dc technique), dc across, 22 sts
Repeat R2 and R3 8 times, you’ll reach R19
R20: turn, ch 3 (as 1 dc or standing dc technique), fpdc across, 22 sts ( fasten off, leave long ends)
Now the ribbed side is the right side and vice versa, from the wrong side, use sc to seam.
Fasten off one top like pic no.4
Turn the right side out, use eyelash yarn to create the white spines, sc across the ribbed lines. Fasten off and weave in ends.
Here’s the step to step photo tutorial:
Stuff your green tube with fiber fill, attach to the soil.
A cute cacti plant should have its’ little flower so I put one on top and tah dah xD
Happy crocheting!
Written pattern and photos copyright Maz Kwok 2014. Please do not repost, republish or sell the content or photos as your own. You can sell the items you made from this pattern as long as you use your own pictures and give back proper credit. Please do share this pattern with others by link. For more info, visit my Copyright page.
- Stay in touch via my social media channels: Facebook, Pinterest, Twitter, Instagram or subscribe to my Newsletter.
- Use the green button at the bottom of this post to print or save a pdf file for personal use.


I love your tutorial. Because it’s so beautiful and steps are clearly.l saved the picture in my pins board. Thank you so much for sharing us.❤
I love this pattern. Thank you for sharing
Wow! Looking for a hairy/icy cactus? -Yes, for days!
Have you found one? – Yeap, the perfect one, I dare say!
It’s just incredible… I´ve just bought the pot this morning,
a fiend wants one an so do I 🙂 I´ll make mine first, if she
likes it, I`ll crochet hers 😉
By the way does any of you ever have three or four project going on at the same time? Good or bad habit; what do you think?
Thank you for your comment Angelica 🙂
I can have like 10 PHD (Project Half Done) at the same time. Many crocheters have this habit, too. Not sure if it’s good or bad but as long as the multi-tasks are in controlled, I guess it’s good lol. Btw, I’d to see your lovely cacti xD