
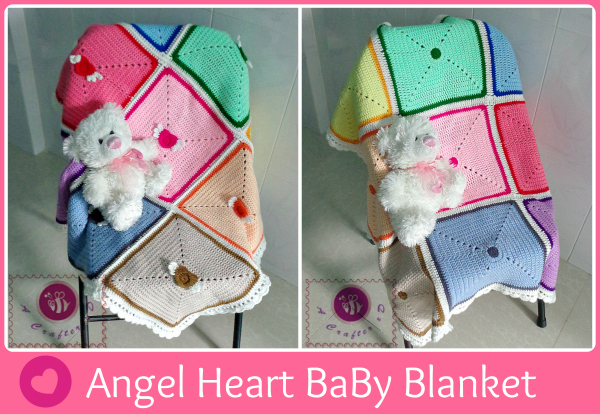
last year I designed the Angel heart granny square – a slanted winged heart on a solid granny square. I wanted to make a granny square baby blanket but had no time to finish it. Therefore, until now, I have been able to post this crochet project xD
It’s a reversible crochet baby blanket, with flying hearts on the front side and colorful dots on the backside.
Click here to <3 this pattern on Ravelry
Materials: ( I used )
4mm crochet hook
Lightweight/ DK yarn: white, pink, blue, purple, yellow… ( many colors / 600 gr )
Yarn needle
Scissors
Note: I used chainless starting dc/tr for every first dc/tr of each round instead of ch 3/ch 4. There’s another good crochet technique to use is ch2/ch3, dc/tr into the same stitch ( counted as 1st dc/tr ). In the pattern below you’ll see I simply state dc/tr for every first dc/tr of each round, so just choose your best technique 🙂
- You can use any hook size for this crochet angel heart baby blanket pattern, just choose a yarn type that matches.
- This is a type of scrap yarn crochet project, fun and colorful. I also modified the square pattern a bit to have a straight flying heart on the square.
- Each square size: 10 x 10 inches
- Finished crochet project: 35 x 35 inches ( stroller size )
Special stitch used: 5dc-shell stitch ( 5 dc into same stitch or space )
Skill level: Intermediate
Pattern:
Visit my Angel heart granny square post for the winged heart pattern.
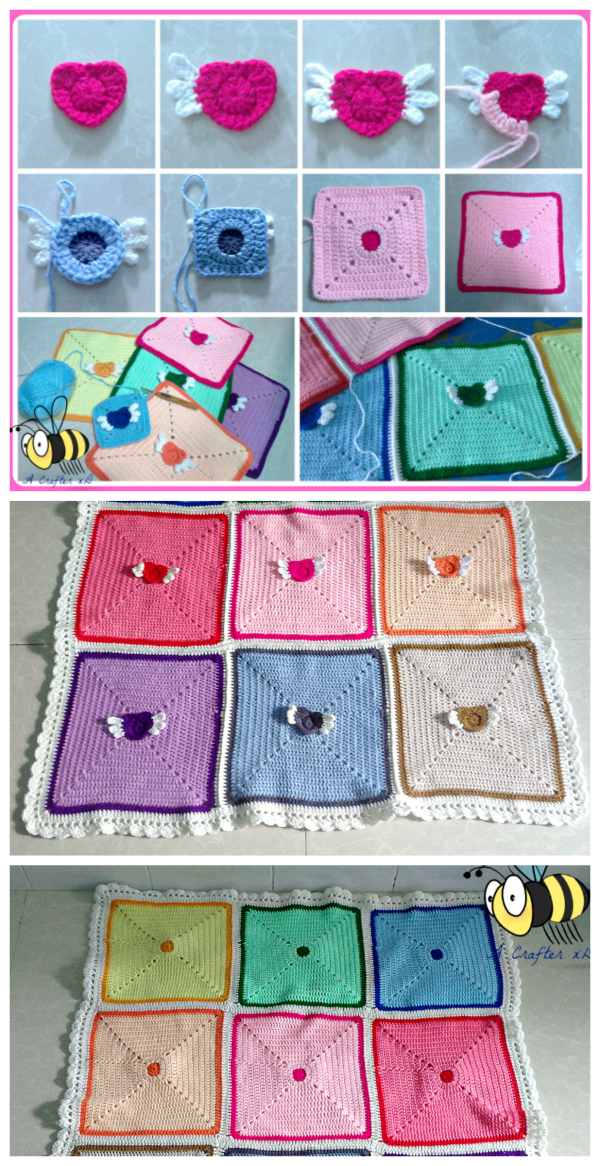
Heart: with color A yarn
Wings: with color B yarn
Square bed: with color C yarn ( solid square )
Flip the heart, you’ll see the back-loops.
R1: Insert hook into the 3rd back loop from the last st of R1 ( the heart part). Crochet 2 dc into every loop, sl into first st to join, total 24 sts.
R2: 1 tr and 1 dc into same st, 4 dc across, 1 dc and 1 tr into next st, ch 2, *1 tr and 1 dc into next st, 4 dc across, 1 dc and 1 tr into next st, ch 2* repeat ** 3 times, sl into first st to join.
Now every ch 2 at the corners is a ch2-space.
R3: (8 dc across, 2 dc into next ch2-space, ch 2, 2 dc into the same ch2-space) x 4 times, sl into first st to join.
R4: 10 dc across, 2 dc into next ch2-space, ch 2, 2 dc into same ch2-space, *12 dc across, 2 dc into next ch2-space, ch 2, 2 dc into same ch2-space* repeat ** 3 times, 2 dc across, sl into first st to join.
R5: 12 dc across, 2 dc into next ch2-space, ch 2, 2 dc into same ch2-space, *16 dc across, 2 dc into next ch2-space, ch 2, 2 dc into same ch2-space* repeat ** 3 times, 4 dc across, sl into first st to join.
R6: 14 dc across, 2 dc into next ch2-space, ch 2, 2 dc into same ch2-space, *20 dc across, 2 dc into next ch2-space, ch 2, 2 dc into same ch2-space* repeat ** 3 times, 6 dc across, sl into first st to join.
R7: 16 dc across, 2 dc into next ch2-space, ch 2, 2 dc into same ch2-space, *24 dc across, 2 dc into next ch2-space, ch 2, 2 dc into same ch2-space* repeat ** 3 times, 8 dc across, sl into first st to join.
R8: 18 dc across, 2 dc into next ch2-space, ch 2, 2 dc into same ch2-space, *28 dc across, 2 dc into next ch2-space, ch 2, 2 dc into same ch2-space* repeat ** 3 times, 10 dc across, sl into first st to join.
R9: 20 dc across, 2 dc into next ch2-space, ch 2, 2 dc into same ch2-space, *32 dc across, 2 dc into next ch2-space, ch 2, 2 dc into same ch2-space* repeat ** 3 times, 12 dc across, sl into first st to join.
R10: 22 dc across, 2 dc into next ch2-space, ch 2, 2 dc into same ch2-space, *36 dc across, 2 dc into next ch2-space, ch 2, 2 dc into same ch2-space* repeat ** 3 times, 14 dc across, sl into first st to join.
R11: change to color A yarn, 24 dc across, 2 dc into next ch2-space, ch 2, 2 dc into the same ch2-space, *40 dc across, 2 dc into next ch2-space, ch 2, 2 dc into the same ch2-space* repeat ** 3 times, 16 dc across, sl into first st to join. ( fasten off )
- Crochet 9 squares with different color themes, now it’s time to join them. There are many ways to join crochet motifs, and you can pick any method you want.
- As these are solid crochet squares, I decided to use the double crochet-2 together seams method which would add one more row to the motifs. Then crochet the border around with double crochet ( using color B yarn- 2dc, ch2, 2dc into each corner ).
After all, time for crochet edging.
With color B yarn, continue from the last stitch of the border round.
R1: ( dc, skip 1 st, dc into next stitch ) repeat around the blanket, sl into first st to join.
R2: sc into 1st stitch, skip next ch1-space, 5 dc- shell stitch into next stitch, skip next ch1-space, ( sc into next stitch, 5 dc- shell stitch into next stitch, skip next ch1-space ) repeat around the blanket, sl into first st to join. ( fasten off, weave in ends )
You can have the ad-free, full instruction version with crochet edging stitches diagram in this instant download pdf file on Ko-Fi
Happy crocheting!
Written pattern and photos copyright Maz Kwok 2015. Please do not repost, republish or sell the content or photos as your own. You can sell the items you made from this pattern as long as you use your pictures and give back proper credit. Please do share this pattern with others by link. For more info, visit my Copyright page.
- Stay in touch via my social media channels: Facebook, Pinterest, Twitter, Instagram or subscribe to my Newsletter.
- Use the green button at the bottom of this post to print or save a pdf file for personal use.

One comment
Comments are closed.