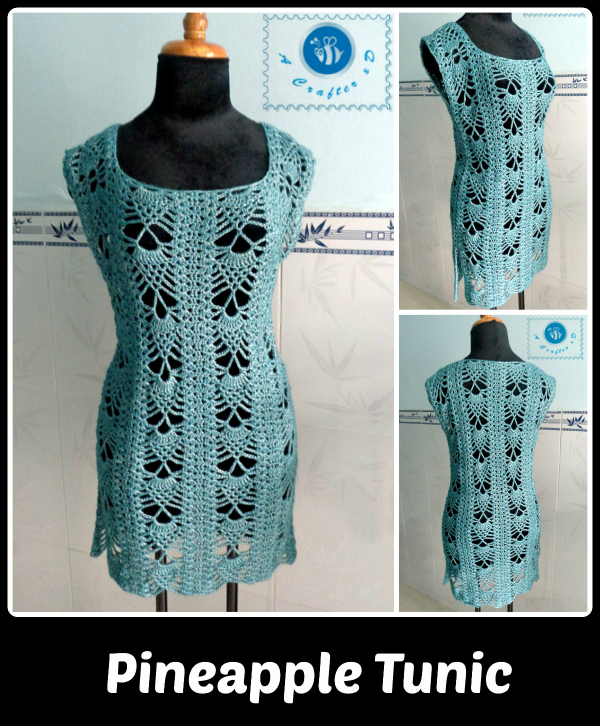
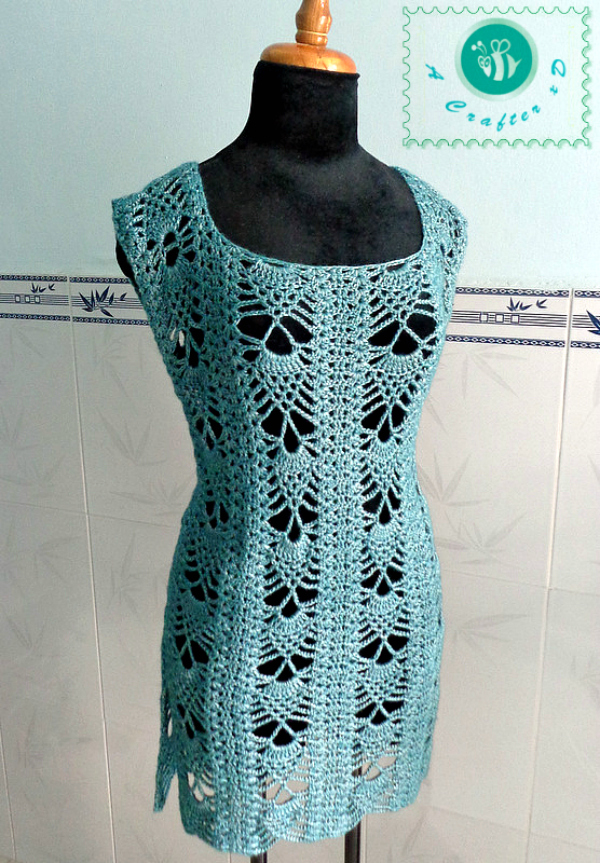
Here is the 3rd pattern of my pineapple stitch crochet projects series. It’s a tunic as a casual and elegant cover top or dress.
Click here to <3 this pattern on Ravelry
Materials: ( I used )
3.25 mm crochet hook
Sport weight yarn: emerald green ( 300 gr for the sample – size L/ 100 gr or 256 yds per skein )
( Check out my Yarn shop – free worldwide shipping )
Yarn needle
Scissors
Note: I used chainless starting dc for every first dc of each row/round instead of ch 3. There’s another good crochet technique to use is ch 2, dc into same stitch (counted as 1st dc). In the pattern below you’ll see I simply state dc into 1st stitch for every first dc of each row/round, so choose your best technique 🙂
Special stitch used:
2dc-V stitch: ( 2 dc, ch 2, 2 dc ) into same stitch or space
This crochet pineapple tunic pattern fits size L ( chest size: 36 to 38 inches )
Skill level: Intermediate
Gauge: 10 double crochet stitches x 4 rows approximately 2 inches ( with materials indicated )

Tunic:
Front piece: work in rows
R1: Ch 78, dc into 3rd ch from hook, ( the first 2 ch doesn’t count as 1st dc ), skip 2 ch, 2dc – V stitch into next ch, ch3, skip 3ch, sc into next ch, ch6, skip 3ch, sc into next ch, ch3, skip 3ch, 2dc-V stitch into next ch, skip 2ch, dc into next ch,* dc into next ch, skip 2ch, 2dc-V stitch into next ch, ch3, skip 3ch, sc into next ch, ch6, skip 3ch, sc into next ch, ch3, skip 3ch, 2dc- V stitch into next ch, skip 2ch, dc into next ch* repeat ** 3 times across, turn.
R2: * dc, skip 2 sts, 2dc-V stitch into next ch2-space, skip next (2 sts and ch3-space), 9 tr into next ch6-space, skip next (ch3-space and 2 sts), 2dc- V stitch into next ch2-space, skip 2 sts, dc into next st* repeat ** 4 times across, turn.
R3: * dc, skip 2 sts, 2dc- V stitch into next ch2-space, ch2, skip 2 sts, sc into next st, ( ch3, skip 1 st, sc into next st ) x 4 times, ch2, skip 2 sts, 2dc-V stitch into next ch2-space, skip 2 sts, dc into next st* repeat ** 4 times across, turn.
R4: * dc, skip 2 sts, 2dc- V stitch into next ch2-space, ch3, skip next (2 sts and ch2-space), sc into next ch3-space, ( ch3, skip 1 st, sc into next ch3-space ) x 3 times, ch3, skip next (ch2-space and 2 sts), 2dc-V stitch into next ch2-space, skip 2 sts, dc into next st* repeat ** 4 times across, turn.
R5: * dc, skip 2 sts, 2dc- V stitch into next ch2-space, ch4, skip next (2 sts and ch3-space), sc into next ch3-space, ( ch3, skip 1 st, sc into next ch3-space ) x 2 times, ch4, skip next (ch3-space and 2 sts), 2dc-V stitch into next ch2-space, skip 2 sts, dc into next st* repeat ** 4 times across, turn.
R6: * dc, skip 2 sts, 2dc- V stitch into next ch2-space, ch5, skip next (2 sts and ch4-space), sc into next ch3-space, ch3, skip 1 st, sc into next ch3-space, ch5, skip next (ch4-space and 2 sts), 2dc-V stitch into next ch2-space, skip 2 sts, dc into next st* repeat ** 4 times across, turn.
R7: * dc, skip 2 sts, 2dc- V stitch into next ch2-space, ch8, skip next (2sts and ch5-space), sc into ch3-space, ch8, skip next (ch5-space and 2 sts), 2dc-V stitch into next ch2-space, skip 2 sts, dc into next st* repeat ** 4 times across, turn.
R8: * dc, skip 2 sts, 2dc-V stitch into next ch2-space, ch3, sc into ch8-space, ch6, sc into next ch8-space, ch3, 2dc- V stitch into next ch2-space, skip 2 sts, dc into next st * repeat ** 4 times across, turn.
R9: same as R2
R10: same as R3
R11: same as R4
R12: same as R5
R13: same as R6
R14: same as R7
Repeat (from R8 to R14) x 6 more times, until you reach R56 (fasten off)
Shoulder part: back to R1 of the front piece.
R1: insert hook into the 1st ch of R1, dc into 1st ch, skip 2ch, 2dc-V stitch into next ch, ch3, skip 3ch, sc into next ch, ch6, skip 3ch, sc into next ch, ch3, skip 3ch, 2dc- V stitch into next ch, skip 2ch, dc into next ch, turn.
R2: dc, skip 2 sts, 2dc- V stitch into next ch2-space, skip next (2 sts and ch3-space), 9 tr into ch6-space, skip next (ch3-space and 2 sts), 2dc- V stitch into next ch2-space, skip 2 sts, dc into last st, turn.
R3: dc, skip 2 sts, 2dc- V stitch into next ch2-space, ch2, skip 2 sts, sc into next st, ( ch3, skip 1 st, sc into next st ) x 4 times, ch2, skip 2 sts, 2dc-V stitch into next ch2-space, skip 2 sts, dc into last st, turn.
R4: dc, skip 2 sts, 2dc- V stitch into next ch2-space, ch3, skip next (2 sts and ch2-space), sc into next ch3-space, ( ch3, skip 1 st, sc into next ch3-space ) x 3 times, ch3, skip next (ch2-space and 2 sts), 2dc-V stitch into next ch2-space, skip 2 sts, dc into last st, turn.
R5: dc, skip 2 sts, 2dc- V stitch into next ch2-space, ch4, skip next (2 sts and ch3-space), sc into next ch3-space, ( ch3, skip 1 st, sc into next ch3-space ) x 2 times, ch4, skip next (ch3-space and 2 sts), 2dc-V stitch into next ch2-space, skip 2 sts, dc into last st, turn.
R6: dc, skip 2 sts, 2dc- V stitch into next ch2-space, ch5, skip next (2 sts and ch4-space), sc into next ch3-space, ch3, skip 1 st, sc into next ch3-space, ch5, skip next (ch4-space and 2 sts), 2dc-V stitch into next ch2-space, skip 2 sts, dc into last st, turn.
R7: dc, skip 2 sts, 2dc- V stitch into next ch2-space, ch8, skip next (2sts and ch5-space), sc into ch3-space, ch8, skip next (ch5-space and 2 sts), 2dc-V stitch into next ch2-space, skip 2 sts, dc into last st. (fasten off, leave long end for seaming)
Repeat on the other side to make the other one.
Back piece:
From R1 to R14: same as front piece
Repeat (from R8 to R14) x 7 times until you reach R63.
Shoulder part: back to R1 of the back piece.
R1: insert hook into the 1st ch of R1, dc into 1st ch, skip 2ch, 2dc-V stitch into next ch, ch3, skip 3ch, sc into next ch, ch6, skip 3ch, sc into next ch, ch3, skip 3ch, 2dc- V stitch into next ch, skip 2ch, dc into next ch, turn.
R2: dc, skip 2 sts, 2dc- V stitch into next ch2-space, skip next (2 sts and ch3-space), 9 tr into ch6-space, skip next (ch3-space and 2 sts), 2dc- V stitch into next ch2-space, skip 2 sts, dc into last st. (fasten off, leave long end for seaming)
Repeat on the other side to make the other one.
From the wrong side, seam shoulder parts with sc or sl. ( cluster of stitches: dc, 2dc-V stitch ) at both sides of the shoulder part.
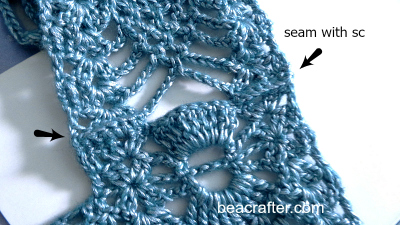
From the wrong side, put front and back hemlines equally, seam side lines, leave open armholes ( Your 1/2 armpit measurement + 2 to 4 inches ) and slits on both sides ( about 8 to 10 inches )
Weave in all ends and steam block your finished project if needed.
You can have ad-free, suggestions for size XXS to XXL with stitches diagram in this instant download ebook of 3 patterns on:
( There’s an itsy bitsy fee for it, thanks for your support )
Happy crocheting xD
Written pattern and photos copyright Maz Kwok 2015. Please do not repost, republish, or sell the content or photos as your own. You can sell the items you made from this pattern if you use your pictures and give back proper credit. Please do share this pattern with others by link. For more info, visit my Copyright page.
- Stay in touch via my social media channels: Facebook, Pinterest, Twitter, Instagram or subscribe to my Newsletter.
- Use the green button at the bottom of this post to print or save a PDF file for personal use.

Thank you for sharing this pattern. I love the look. I am starting to make some things for myself, which I have never done. I look forward to making this for myself and anyone else who might would like it as well. I’ve never worked with DK weight yarn so this will be a new challenge for an old crocheter. I have been crocheting for 37 years. I always enjoy seeing your patterns, thank you for the work and dedication you have to crafting.
Ok thank you. I’m loving your tops. Can’t wait to try them out.
I just came across this pattern and your site. I love this top. I was wondering if a worsted weight would work For this pattern?
Hi,
If you want to use worsted weight yarn then choose a bigger hook that matches. The tunic’s size will be larger, too.
This is beautiful. Thanks for sharing!
This tunic is beautiful! Thanks so much for sharing this pattern!
another oh so beautifully elegant pattern Maz! Not sure how you do it but you have some mad crochet skills! So glad you share with us at Snickerdoodle! We can just dream of doing half this beautiful!
Thank you 🙂
I Love when people that think they know what they’re doing write patterns and parts of it are complete gibberish! I Love your design, but what is your idea of lghweight yarn? Fingering? DK? Sport? And as far as giving yarn amounts in Grams, in order to use that bit of info we would need to know what yarn you used? Because every yarn weighs differently depending on the content and the loft. So yarn is measured by Yards or meters. We can purcase x amount of yards or meters and know we’ll have enogh yarn of the same dye lot to complete a Project. Buying yarn in Gram weights does not work. Beautiful design, too bad no useable info besides that
Hi there,
Light weight yarn is also called Dk yarn ( 300 gr ~ 900 yards ). If I meant other type of yarn I would use exact name ( fingering/ sport yarn). Yarn is not just measured by yard, if so you won’t see gram or ounce measurements in every skein. Have a nice day!
Amazing work! I also really like your Barbie dress patterns. Thanks for the pattern:-)